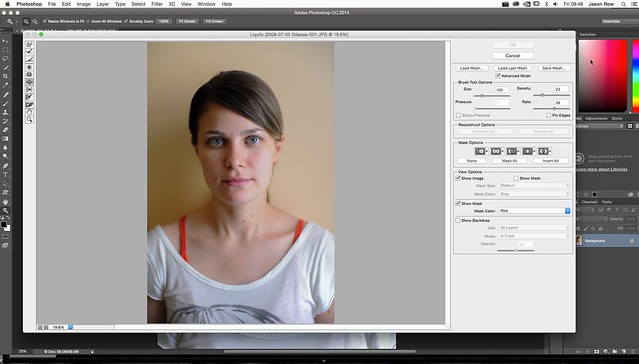

If you are touching up stock photos to fit your campaign’s needs, the Liquify tool can help you make mind-bendingly creative moves that also allow your images to pop off the screen. This tool is used to bend, distort, and reshape areas of an image with various effects. Common uses of the Liquify tool in Photoshop include fixing the fit of clothing, making a rippling, underwater effect over the image, or even slimming people and objects to a desired profile. Depending on how you use it, the Liquify tool’s effects can be wildly pronounced or incredibly subtle. Understanding the Liquify Tool SettingsTo understand how to use the Liquify tool in photoshop, you need to understand all the various aspects of its operation, and there are a lot of effects and settings that control the output.Forward Warp is the most commonly used setting, and it allows for the creation of distortion effects with the movement of a brush. Adjust brush pressure, density, size, and weight while controlling extra jitter, and create exactly the right bend to reshape objects.Twirl rotates pixels clockwise while you drag, to produce a counterclockwise swirl over a selected area. Faster brush rates while using this tool speed up the swirling effect, making it more intense.Pucker and Bloat use the same effect in different directions.
Free Liquify Photoshop Tool
Pucker draws pixels in toward a central location you select, and bloat pushes them out. The settings used in the Forward Warp control the intensity and size of effects.The Push Tool works in several directions. Vertical pushes move objects to the left as you move up, and to the right as you move down. Horizontal pushes move them up as you move right and down as you move left.
You can also create bends with this tool by moving in a swirling pattern.Mirror creates a reflection of a selection along a line determined by a mouse stroke.Turbulence takes advantage of the jitter factor in the settings discussed under Forward Warp to create distortion.Making Use of the Liquify Tool in PhotoshopRetouching images with the Liquify tool can mean practically anything, because its powerful settings let you change the appearance of objects in so many ways that you can virtually reshape them at will. Create reflections with beautiful effects, push and pull to reshape objects and create wave effects, or bend them into shape to make the exact image you want after you select images from the Shutterstock library to work with. There are too many options to talk about them all.Images hand-picked for you.
I think that I can categorize liquify tool to Photoshop Basics because using liquify tool is so simple and you can do with this tool huge things like editing body shape also you will use this tool during portrait retouching or some type of photo manipulation.Video Tutorial on Page 2.Please note that video tutorial is not full body retouch tutorial. Purpose of this video tutorial is just to show you each of liquify tool.All you need to do is:1. Go to Filter- Liquify2.

Photoshop Liquify Tool Phone
Choose one of the brushes in menu on left.